Gif files are typically used for videos but sometimes you might want to put together a simple illustration animation or a series of pictures to show action. Today, I’m going to share with you how to create GIFs from photos.
I first learned this when a client wanted some still sequence images of her daughter doing a cartwheel turned into a gif to share on her blog. I’m a google, skim info and roll with it kind of self learner and picked it up. I used this same technique to make my dancing avatar of myself on my home page. I was bored waiting for my mom to get ready while visiting her in Nevada before we were going to watch the Gilmore Girl’s revival. To entertain myself, I started playing around with selfies and whipped this up. Here is how it is done:
This tutorial uses Photoshop CS6. You can use this for a series of illustrated or digital design images or photographs. The photos don’t have to be a sequence of the same type of photos, they can be totally random and it will just flip through them and play for however long you select when you create the GIF from photos. Today I’ll be using photos, but the process is the same for digital designs, etc. First have your image files ready to go and saved in the same folder together. You can use any type of image file, including PNGS with transparencies.
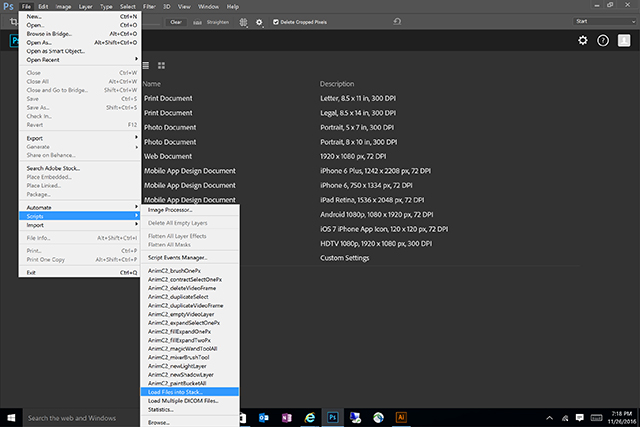
Open up Photoshop and go to –> File –> Scripts –> Load Files into Stack
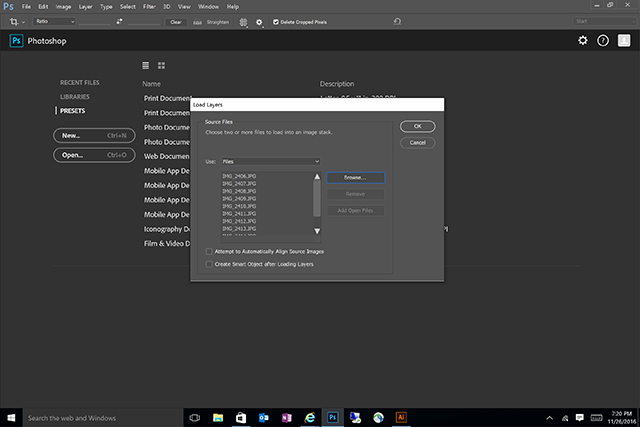
Then you will click “browse” and locate the files in the folder you saved them. Hold down “CTRL” and select all of the images you want to include and hit “ok”. This will pull in all of the images for you. Then hit “OK” again.
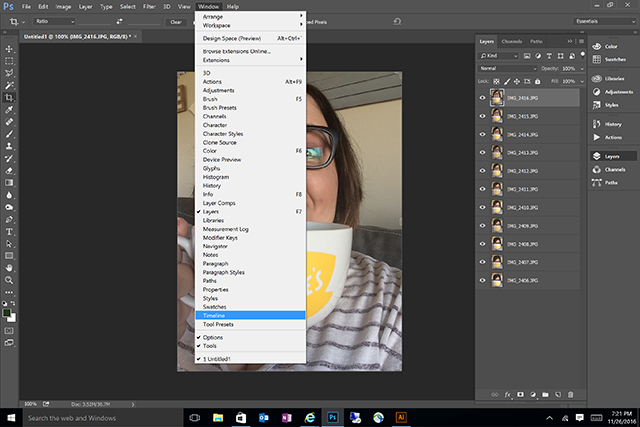
You’ll see all of the images as individual layers. Then you’ll want to go to window — > timeline
This will open a timeline panel at the bottom of the window. Then you’ll click “Create Frame Animation”.
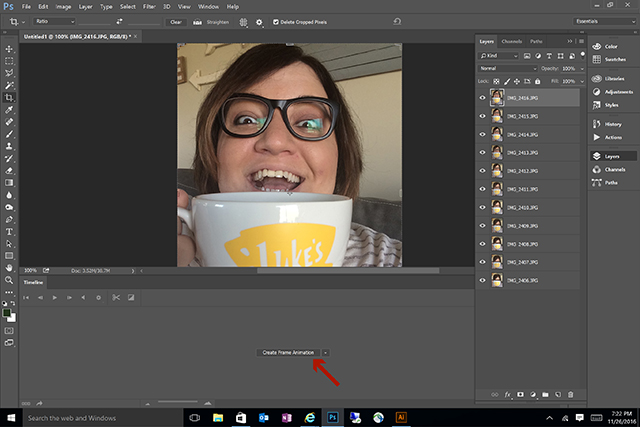
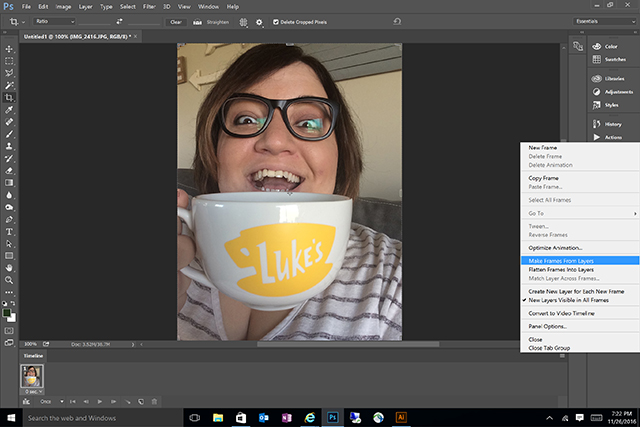
This will pull the current layer into the animation frame window. Then you’ll click the three lines and select “Make Frames from Layers”.
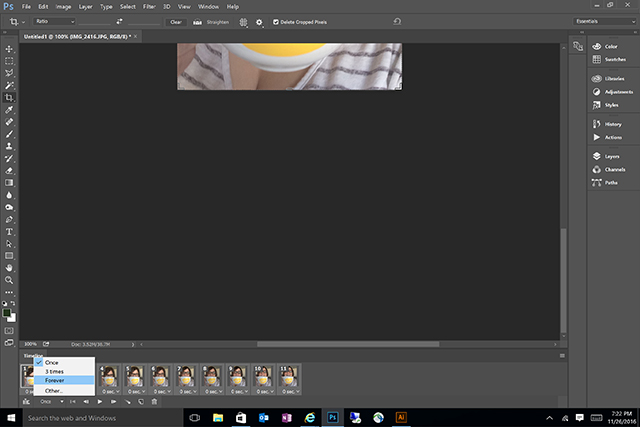
Then I like to select how much I want it to loop. This means how many times it plays through each of the images. The ones in this post are looped “forever”.
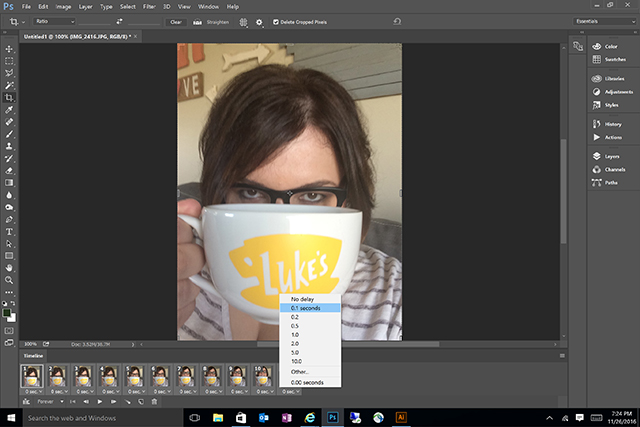
Then we want to select how long we want each frame to play for in the animation. If you are doing them for all the same amount of time, you can click the first photo in the timeline window and hold down “Shift” and then click the last photo in the timeline window. This selects all of them so when you click the dropdown arrow below one of the pictures, the selection you make there will be selected for all of the frames.
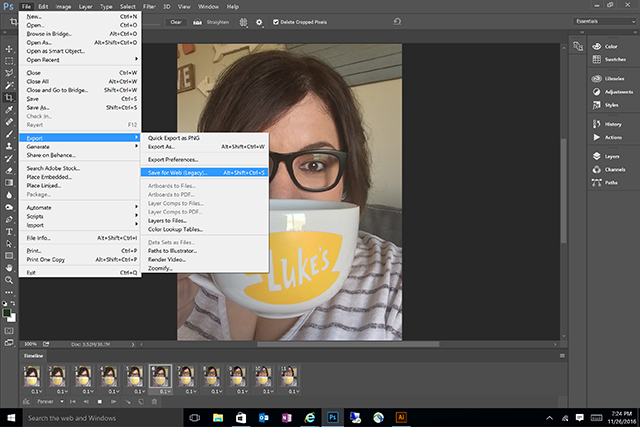
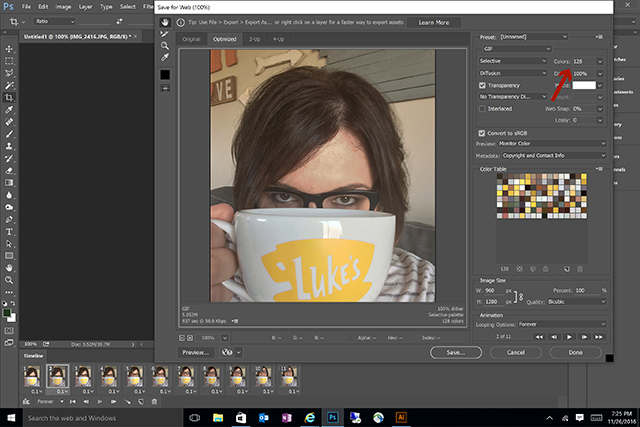
You can see the animation by hitting the play arrow at the bottom of timeline window. Adjust the times to get it how you want it. When you are finished, go to file and save to save the .psd file. I’m a big advocate of saving as I go, so by this point, I’ve probably saved at least 5 times. Have you ever lost a file in the middle of work? Anyway, once you are ready to export the finished gif, go to –> File –> Export –> Save for Web.
Then you’ll make sure you have 128 selected for the colors then select “save”.
When you open the file to preview it, you should see the animation at work. Then it’s ready for you to upload and share!
These are kind of addicting and so much fun! Once you do one, it becomes so much easier. When my mom finished getting ready, I showed her what I made and she wanted to make one too so we did one really quick. Very fun and we ended up laughing hysterically. I love the last frame. This one is set to a slower frame animation and you can see the difference

That’s it! There are other programs that delve much deeper into animation but this is a pretty simple how to create gifs from photos, using PhotoShop CS6, especially if you don’t have or aren’t familiar with those other programs. Enjoy!







Leave a Reply