• Home
  • Blog
    • DIY
      • Kids
        • Baby
      • Gifts
      • Home
        • Decor
        • Organization
        • School
        • Party
      • Wood
    • Recipes
      • Dinner
      • Quick & Easy
      • Side Dish
      • Dessert
    • Photography
      • Children
      • Couples
      • Family
      • Wedding
      • Misc.
      • Tips & Tutorials
    • Holiday
      • Christmas
      • Halloween
      • Thanksgiving
      • Valentine’s Day
    • Printables
  • PORTFOLIO
  • ABOUT
    • Hip & Simple | Jessika Reed
  • CONTACT ME
    • Facebook
    • Google+
    • Instagram
    • Pinterest
    • Twitter

JESSIKA REED

Hip & Simple Creativity

Llama Fest 2010!

We went to the 16th annual Llama Festival at the Krishna Temple in Spanish Fork, Utah. My photography teacher, gives “event highlights” during every class, to give us ideas of places we can go and practice photography and this was one of her suggestions. It was cheap to get in, there are lots of Llamas and people. There were craft booths and food. The palace was beautiful and it looked almost fake in the setting but it was a really cool building. We had to take off our shoes to go inside the palace. I got some pretty cool pictures. A lot of me SOOC (straight-out-of-the-camera) shots were pretty good but I wanted to pump them up and make them look even better. I have been reading Pioneer Woman’s website a lot lately and used a lot of her techniques on these. She has some amazing photography and she shares so many ideas, I love it!

Anyway, I posted most all of the pictures that turned out, on Facebook earlier, but here are some “before and after” shots to show some of the editing I did!
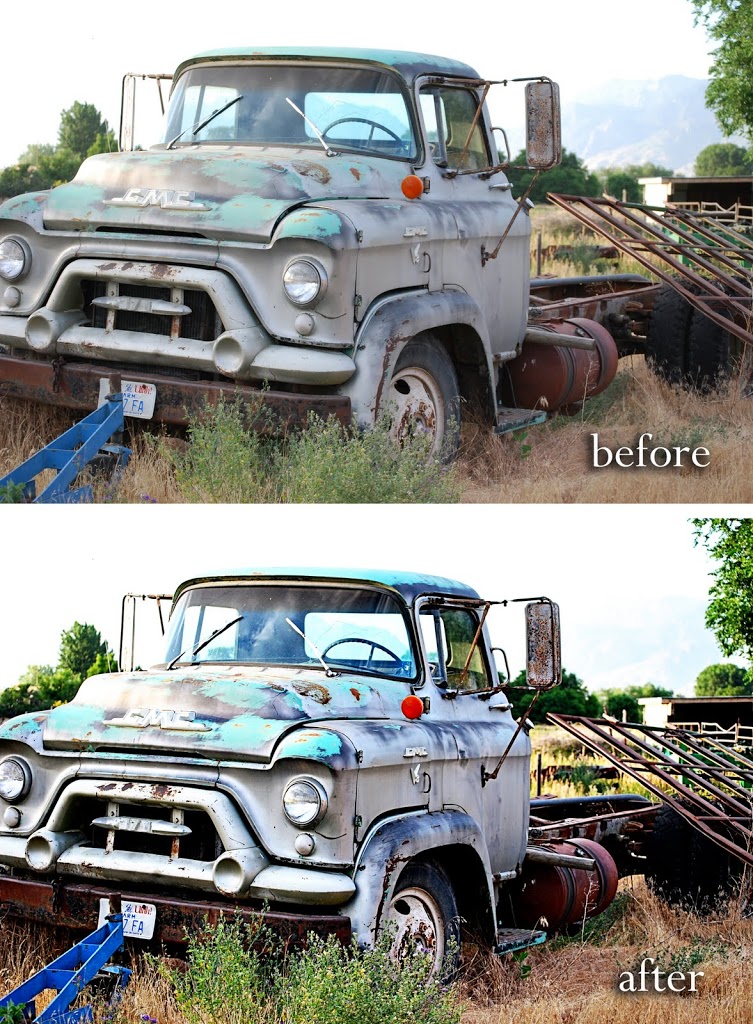
This cool truck was on a farm across from the temple. We didn’t see the “NO TRESPASSING” sign until after we left… whoops.


[Read more…]

Selective Depth of Field

Yes, I should be doing homework… but I am not, well kind of but not really! My assignment in my photography class this week is selective depth of field. This is where one thing in the photograph is in focus and sharp and the rest of the photo starts to blur and fade out. Of course this looks really cool in wedding and engagement pictures and I have seen many examples of it, but wasn’t quite sure how to achieve it. I also found out this is how my favorite bloggers (and professionals shooting for magazines and ads) make their food look so good when they post a recipe with pictures! So I thought I would play around with it. My class is a B&W film class, so I don’t get the instant gratification of knowing if I have been able to pull off this skill, I have to wait and go through the developing process and waste film. So these are just stupid things that I was playing around with at home with my digital camera, that I thought I would share! I don’t have this down at all but I am excited to use it. The photography blogs I have been stalking lately, use this technique quite a bit!

Real exciting stuff… Comcast remote! I still think it looks cool though!

[Read more…]

Photography

I am majoring in Graphic Design at UVU but am considering doing a double major in photography (they don’t offer a minor). I am taking my first photography class since high school. My mother was kind enough to let me borrow her Nikon D60 and model for me so I could practice what I have been learning. I then wanted to practice what I have been learning in photoshop as well. I didn’t want to change the pictures too much but wanted to play around with some of the effects. Here are the before and after shots that I got! These were done at Wheeler Farm! The “before” shots are straight out of the camera.

[Read more…]

loving life!

So life is fantastic right now! It has been a while since my last post, but things have been a little crazy! At the beginning of May, I went back to school for Graphic Design. I am going to Utah Valley University and I hope to graduate in Spring 2012! I am loving school, there are some classes that I need to take that aren’t related to my degree, but the one’s have been taking this semester are awesome right now! I am learning so much!!! I left my job at Tanner LC last week, so I could focus on my educational goals. It was the end of a great era but I am really excited for all the stuff is going on right now! With all of these changes, I am learning how to live very cheaply! We made homemade chocolate dipped pretzels and Stephen is loving this cheaper version of our lives (and his snacks)!!

Stephen is back in kickball for his second year! He loves the game, who wouldn’t? He is still the best husband and most hilarious man I know!
We gave Molly a haircut and had them shave her like a lion! She is adorable, I will have to post some pictures of her soon! Royce is doing great as well!
Anyway, there are a lot of things going on but it is all great and we are happy as can be!

Craft Fever!

I am slowly becoming my mother! Lately I have been feeling the creative itch and have been working on creating some new things including wood crafts, quilts, furniture, painting my house, etc. Last weekend Stephen and I went to a cute little boutique in American Fork, called “Polka-Dot Door”. There was a sign on the window that said “booth vendors wanted”. I haven’t really thought about doing a boutique before but for some reason I brought it up to the owner and got all the info on the process. I went to the store to get supplies and started creating some stuff that I had in my head. Yesterday I went in and met with the owner and showed her some of my stuff. I got set up in a booth right away! If you are in the American Fork area, be sure to check out this cute boutique!

I didn’t want to post the pictures below, quite yet because I had planned on making the owl for my mom’s birthday and didn’t want her to see it. We celebrated her birthday today and she loved her owl! She commented that she is retiring from her wood crafts and thinks I should take over! If you have done craft nights with my mom in the past or want to have a fun little craft night with your friends, let me know and we will work on getting something set up!

Here are the pictures of the owls and my new booth space! I need to create some more stuff to fill up the space!

The new booth! You can see the space from the window and front door and it is directly across from the cash register!

This is the owl that I gave my mom!

Here is another verison!

This is my other design I made a little while back. I want to make a couple of adjustments to the pattern before I put any in my boutique! I have some work to do!

Here you can see the rest of the set, you change out the middle piece each month!

Easy Valentines Day project

I am always competing with my neighbor for the best front door display, I don’t know why but I just feel the need to beat them and be the better looking house! My mom and I were shopping at Gardner Village and saw this really cute heart at Upon the Shelf that would look great on my front door…. the only problem was it was $47 which I am not about to drop on something like this, when I can easily make it. The only difference between mine and the one at Upon the Shelf, is that they had wood on the back (which made it heavy) and then at the top of the heart instead of ribbon to hang it, it had a metal decorative piece to hang it (again that was heavy). Overall, I think they look very similar (sorry I don’t have a picture of the original) and mine cost a fraction of the price and took maybe an hour!

This is the final product

You will need

1/2 yard of fabric
Assorted Ribbon or fabric scraps (I used 2 varieties – 1 was about a yard and a half long and was 5 inches wide and the other was about a yard long and 2 inches wide)
1 – stapler that opens and of course staples
1/2 yard of batting
1 foam board (I used 3/4 thick but there are thinner options that are a little cheaper
A needle and some thread
Large bread knife


Draw a heart on your foam board, make sure that it can be completely covered with batting and the fabric can wrap around to the back edge.

Cut your heart using a knife (I just used a steak knife) this doesn’t need to be perfect because it will be covered with fabric but try to stay as close in the lines as possible!


Then place your cut out heart on top of the batting and either trace the heart and cut the batting or just cut the batting around the foam heart.


Look at those straight lines! HA!


Place the fabric right side up over the batting and foam board. Flip it over and start stapling the edges. I did a few staples on one side and then switch to the other, keeping the fabric pulled tight so it had a nice even look on the fabric.

I put lots of staples in, just to be sure it was really secure but it probably didn’t need that many.

Then to make your fabric flowers, take your ribbon or strip of fabric and loosely stitch up one edge of the ribbon.

Once you get to the end of the ribbon, pull the thread tight and sew both ends together. It will make a nice circle that bunches up and looks great. This should be super easy. Repeat this as many times as you want but make sure that the different flowers are different widths so they show up when they are layered together.


Then sew the flowers to the fabric on the board starting with the biggest flower first and make a layering effect.

Then take some ribbon, staple it to the both sides of the top of the heart, on the back. Tie a bow at the top and voila, you are all set!

This is the new look of our front door!!

Wedding Pictures

I have hated my wedding pictures since the day I got the disk in the mail. I cried for a day and a half, and I had to leave work early the next day. One of my coworkers said later that she thought someone had died or something because of how I looked that day. Now maybe that was a strong reaction but I was truly and deeply upset. [Read more…]

Head Case

Recently, I contacted one of Stephen’s old coworkers, who now does hair, for a cut and color. Stephen has been growing out his hair and he was thinking about having it cut by someone for the first time in like 10 years. He said he would like to go to his old coworker and I thought, I need a trim and kind of want a different color so I might as well go to her as well. This was the worst hair experience I have ever had and I will spare you the unprofessional email I received from her but it was just an overall awful and an experience I am glad has finally been resolved. The cut was uneven and more than a little trim, after getting that fixed, my hair is about 1 1/2 inches shorter 🙁 which sucks because I am growing out my hair, I guess it could have been worse though. Here are some pictures to show you what happened with the color:

The color actually looks kind of pretty on the top. I had to curl it because it was the only way to cover up how uneven the cut was!

Again, on the surface the color is okay and actually kind of pretty in some spots.

Then you start looking underneath and you see how uneven it is.

My tiger stripes! These pictures were taken 3 days after the experience, but it almost looks like my roots are growing in, but only in random spots!

My Wilma Flintstone wig! My friend Sarah said the bottom of my hair looked like fake blond doll hair, I totally agree. Oh and it felt like it too, dry but kind of plasticy. ECK! When I was getting it fixed the stylist found little bald spots where the hair had burnt off because the girl left the color and bleach on way too long because she didn’t know what she was doing.


Look at my hairline as it frames my face. So gross!

AHHHH! I am saved! Look how pretty the color is. Even though this isn’t what I wanted in the first place at least it is normal and even and it looks healthy!

No more tiger stripes! There were still a few issues that we couldn’t get cleaned up because the damage was too much, but I think overall it looks a ton better!

I didn’t think it would be nice to name names here for anyone involved, but if you want to have the contact information of the awesome stylist that fixed and saved my hair, please let me know!!!
  • « Previous Page
  • 1
  • …
  • 26
  • 27
  • 28
  • 29
  • 30
  • 31
  • Next Page »

get our newsletter

Categories

Most popular posts

  • 5 Minute No Sew Headband
  • How To Make String Art
  • Corn Nuggets
  • Homemade Real Fruit – Tiger’s Blood Snow Cone Syrup
  • Cheap & Easy Foil Dinner
  • DIY Sensory Activity Board
  • Installing a Stair Runner
  • Stuffed Comfort Cuddle Dino Tutorial
  • Applesauce Cookies
  • Christmas Faux Cardboard Fireplace Mantel

Copyright © 2025 · Pretty Creative On Genesis Framework · WordPress · Log in